MT-ND-TG
T-Grid Antenna Mounting Kit
Universal Antenna bracket for T-Grid Ceiling installation
Description
24-inch T-Grid Antenna Bracket designed for universal indoor ceiling mounting antennas
• Compatible for following antennas
1. Low-profile IXL-MJN-H4U, IXL-YJN-H4PU, IXL-SQx-H6U, IXD-360H04MJN, IXD-360H04YJN
2. Regular cone shape IX-MJx-V3U, IX-MJN-V3P, IX-YUN-V5P, IX-YQx-V4U, IXD-360V03N0-54, IXD-360V03NS, IXD-360V03MDS
• Heavy-Duty bracket
1. Max bearing load; 26.5 lb. /12 kg
2. Max bending load; 30.9 lb./14 kg
Installation Instructions:
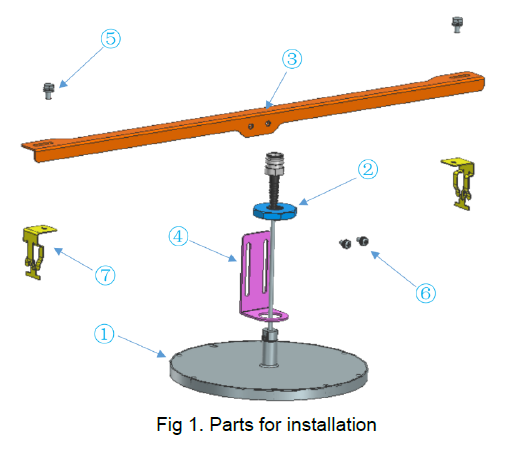
| No | Part Name |
| 1 | Antenna (Not Included) |
| 2 | Antenna mounting plastic nut. M18 |
| 3 | Antenna mounting frame |
| 4 | Antenna bracket for height adjustment |
| 5 | Screws for the mounting frame |
| 6 | Screws for the antenna mounting height adjustment |
| 7 | T-Grid heavy duty clips |
- Pre-assemble the antenna mounting frame ③ and the antenna bracket ④ using screw ⑥, without attaching the actual antenna ① & ②. Do not tighten screw ⑥ so that the bracket can move freely.
- Install the clips ⑦ onto the T-Grid in alignment with where you want to mount the antenna.
- Once installed, position and attach your preassembled antenna mounting frame onto these clips securely using screw ⑤. Ensure that the screws are tightened properly to securely fasten the antenna mounting frame to the-Grid clips.
- Create a hole in the acoustic ceiling board, ensuring that it is slightly larger than the pole for the antenna. The typical diameter of the hole is 0.79 inches [20mm].
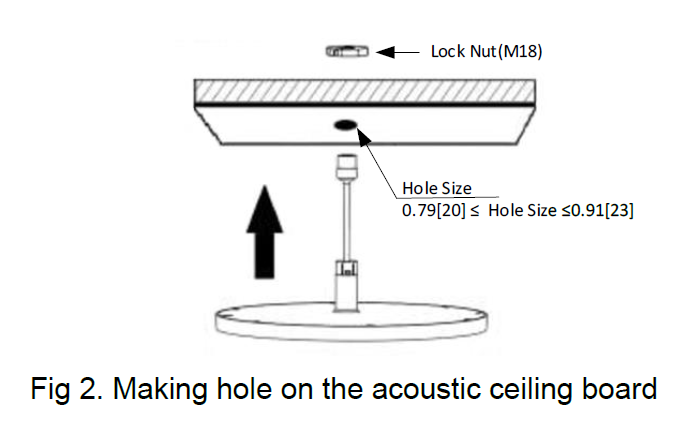
- Attach the acoustic ceiling board onto the T-Grid and Check that it is firmly attached
- Insert the mounting pole of the antenna into the hole in the acoustic ceiling board. Make sure it is secure.
- Connect the antenna to the antenna bracket ④ using the plastic M18 nut ② that is included with the
antenna. Tighten it securely to ensure a stable connection. - Adjust the height of the antenna and use screws⑥ to fasten and secure both ends of the bracket or
mounting pole to ensure stability and prevent any movement or wobbling.
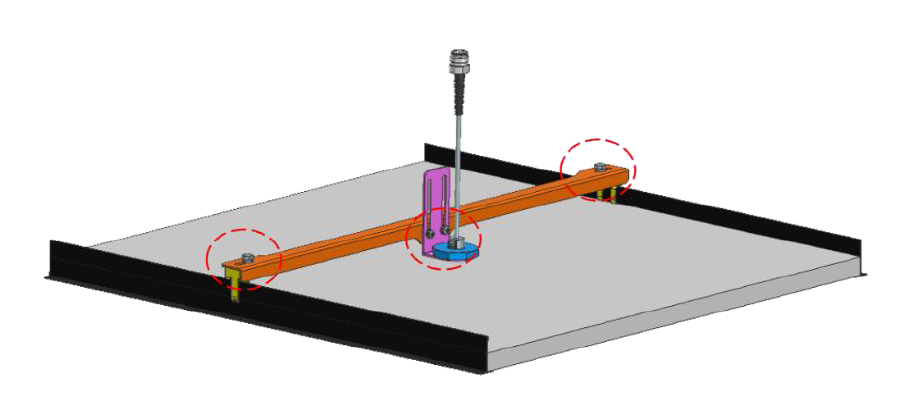
Fig 3. Installation Completion